Upgrade to Swift 5
String class is very rich and great in Swift, but as there is a lot of requirements to have formatted string. Using NSMutableAttributedString and NSAttributedString we can achieve multiple fonts, color, underline, strikethrough, shadow and
a lot more. Let’s explore these class…
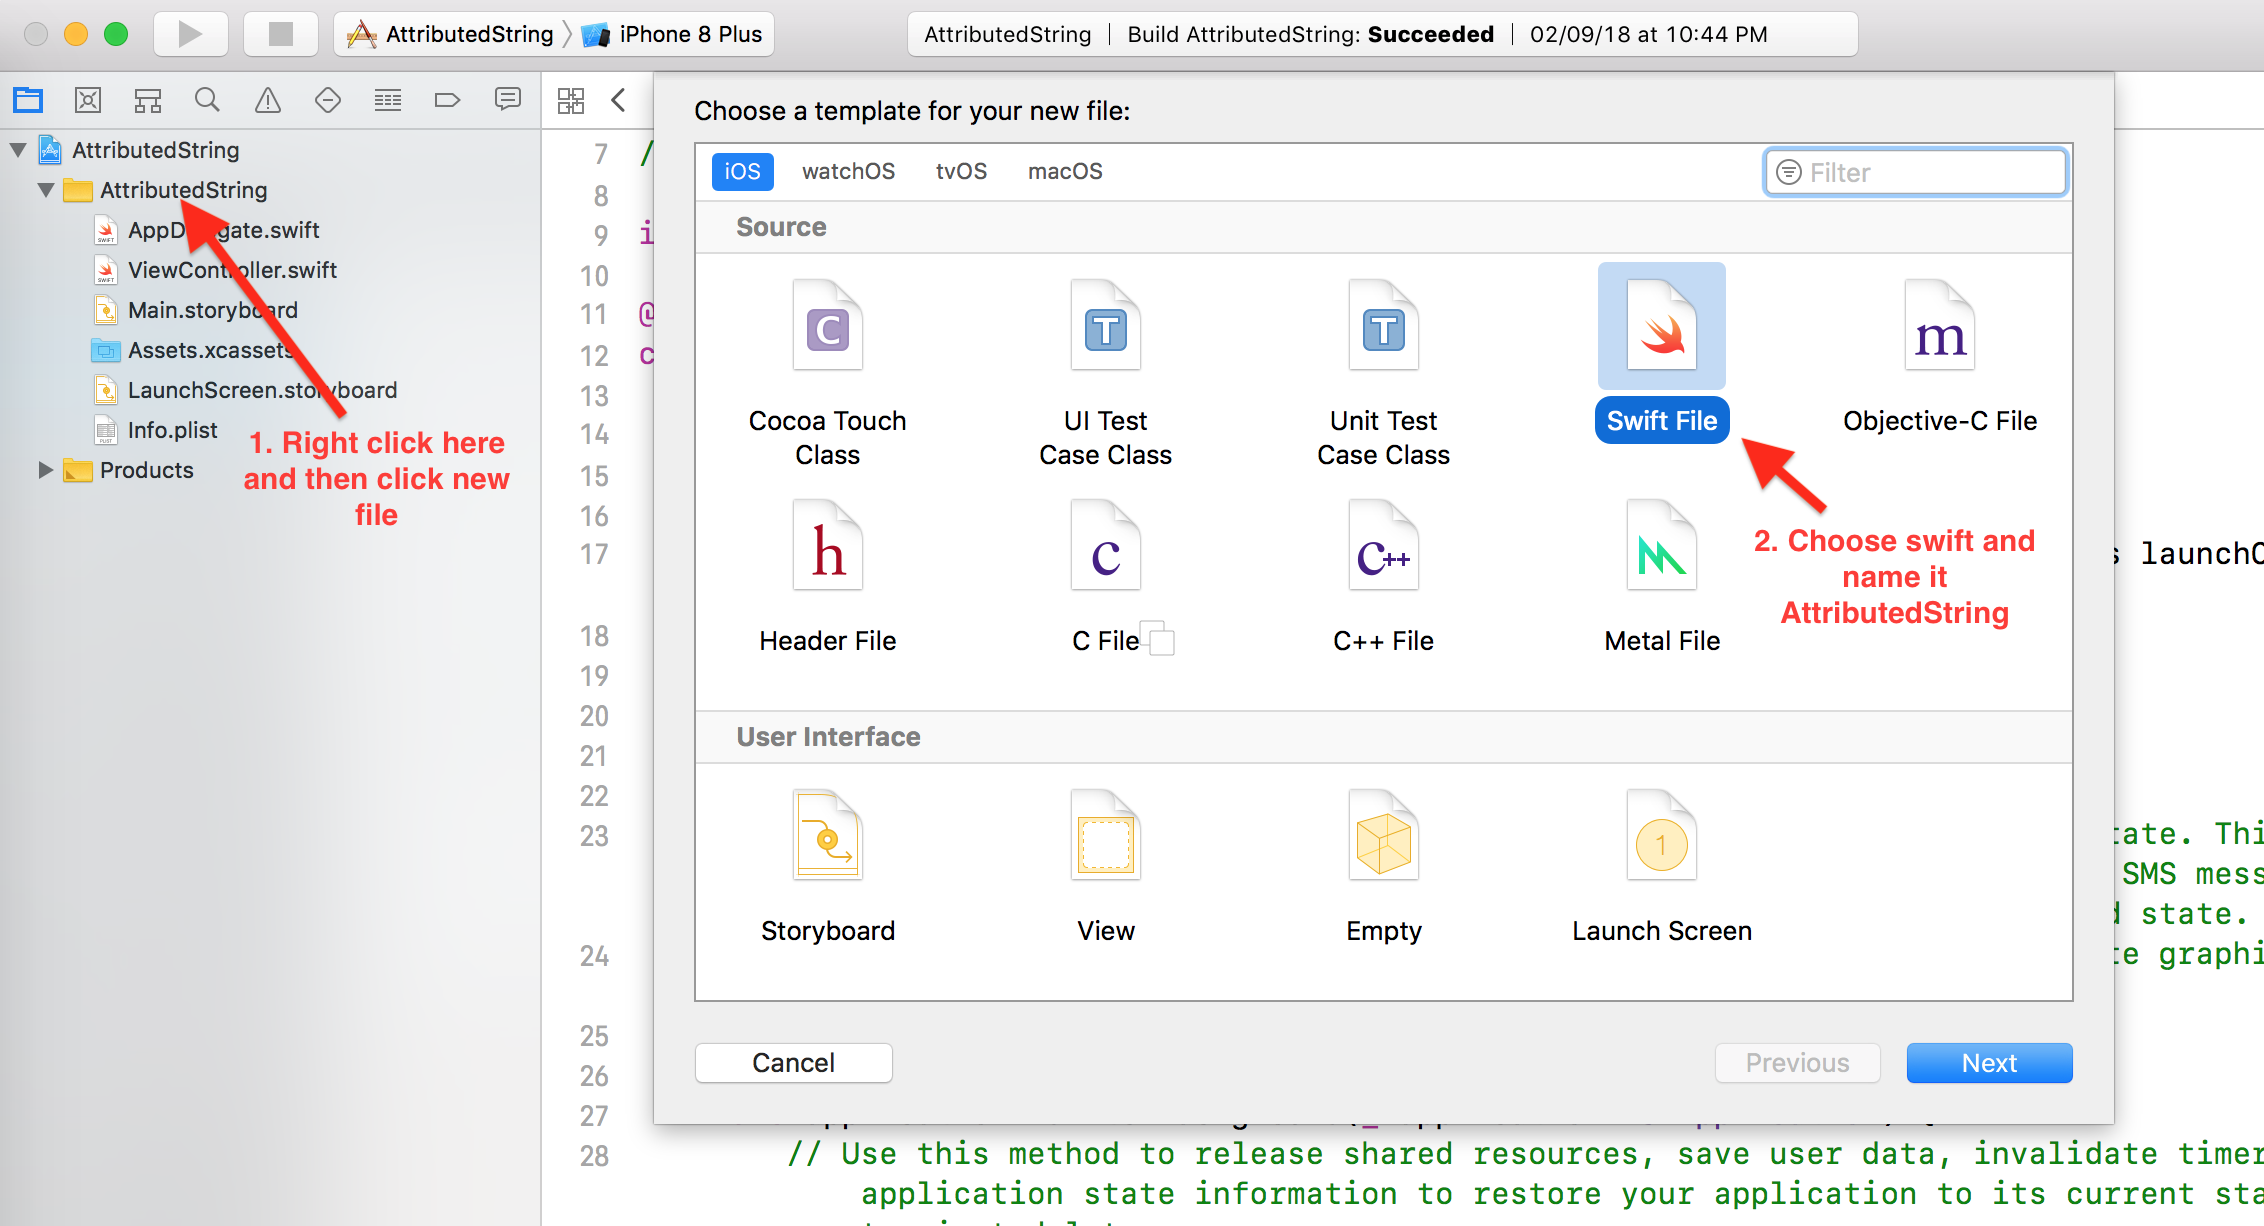
Let’s create new a project and add a swift file.
-Import UIKit
-Create extension of NSMutableAttributedString
import Foundation
import UIKit
extension NSMutableAttributedString {
}
NSMutableAttributedString requires two properties one is attribute(Dictionary) and second one is NSRange. All keys of attributes are define in NSAttributedString.Key extension class and few keys are below:
NSAttributedString.Key.foregroundColor // to change color of string
NSAttributedString.Key.font // to change font of string
NSAttributedString.Key.backgroundColor // to change background color of string
NSAttributedString.Key.underlineStyle // underline below text
NSAttributedString.Key.shadow // add shadow over string
NSAttributedString.Key.paragraphStyle // for paragraph style
NSRange tell us the position of substring and we apply the attribute that position. First we need to change our String to NSMutableAttributedString for this use below function.
NSMutableAttributedString Extension.
extension NSMutableAttributedString {

    class func getAttributedString(fromString string: String) -> NSMutableAttributedString {
        return NSMutableAttributedString(string: string)
    }
}
Now Let’s add more two functions in the NSMutableAttributedString Extension to apply attributes on range and substring
extension NSMutableAttributedString {

    class func getAttributedString(fromString string: String) -> NSMutableAttributedString {
        return NSMutableAttributedString(string: string)
    }

    func apply(attribute: [NSAttributedString.Key: Any], subString: String)  {
        if let range = self.string.range(of: subString) {
            self.apply(attribute: attribute, onRange: NSRange(range, in: self.string))
        }
    }

    func apply(attribute: [NSAttributedString.Key: Any], onRange range: NSRange) {
        if range.location != NSNotFound {
            self.setAttributes(attribute, range: range)
        }
    }
}
Color Attribute
Let’s create a function to apply different different color on a substring or given range. Add these two functions in your extension class.
  // Apply color on substring
  func apply(color: UIColor, subString: String) {

    if let range = self.string.range(of: subString) {
      self.apply(color: color, onRange: NSRange(range, in:self.string))
    }
  }

  // Apply color on given range
  func apply(color: UIColor, onRange: NSRange) {
    self.addAttributes([NSAttributedString.Key.foregroundColor: color],
                       range: onRange)
  }
Now move to your ViewController and in viewDidLoad function create a string and convert this string to NSMutableAttributedString.
let text = "This is a colorful attributed string"
let attributedText = NSMutableAttributedString.getAttributedString(fromString: text)
Now we have a attributed string and we are going to apply different color on each word, let’s see how it’s work. Add below code in your viewDidLoad function.
attributedText.apply(color: appRedColor, subString: "This")
attributedText.apply(color: appYellowColor, onRange: NSMakeRange(5, 4)) //Range of substring "is a"
attributedText.apply(color: .purple, subString: "colorful")
attributedText.apply(color: appBlueColor, subString: "attributed")
attributedText.apply(color: darkOrangeColor, subString: "string")
Now drag and drop a UILabel in interface and create outlet of this UILabel. Assign this attributed string to this label. The complete function will be.
override func viewDidLoad() {
	super.viewDidLoad()
	let text = "This is a colorful attributed string"
	let attributedText = NSMutableAttributedString.getAttributedString(fromString: text)
	attributedText.apply(color: .red, subString: "This")
	attributedText.apply(color: .darkGray, onRange: NSMakeRange(5, 4)) //Range of substring "is a"
	attributedText.apply(color: .purple, subString: "colorful")
	attributedText.apply(color: .blue, subString: "attributed")
	attributedText.apply(color: .orange, subString: "string")
	self.firstLabel.attributedText = attributedText
    }
Now below will be the output.
Font Attribute
Using NSAttributedString.Key.font key we can have different different font in a single string. Let’s see how it works. Add below tow function in your Attributed.swift file.
  // Apply font on substring
  //1
  func apply(font: UIFont, subString: String)  {

    if let range = self.string.range(of: subString) {
      self.apply(font: font, onRange: NSRange(range, in: self.string))
    }
  }

  // Apply font on given range
  //2
  func apply(font: UIFont, onRange: NSRange) {
    self.addAttributes([NSAttributedString.Key.font: font], range: onRange)
  }
1. In this function pass the UIFont object and substring in which you want to apply the font.
2. Sometime there may be a case that a string have two substrings, so in this case use the second function and pass UIFont and NSRange object.
In your ViewController class create a second UILabel and add below code in your viewDidLoad function.
let text = "This string is having multiple font"
let attributedText = NSMutableAttributedString.getAttributedString(fromString: text)
attributedText.apply(font: UIFont.boldSystemFont(ofSize: 24), subString: "This")
attributedText.apply(font: UIFont.boldSystemFont(ofSize: 24), onRange: NSMakeRange(5, 6))
attributedText.apply(font: UIFont.italicSystemFont(ofSize: 20), subString: "string")
attributedText.apply(font: UIFont(name: "HelveticaNeue-BoldItalic", size: 20)!, subString: " is")
attributedText.apply(font: UIFont(name: "HelveticaNeue-ThinItalic", size: 20)!, subString: "having")
attributedText.apply(color: UIColor.blue, subString: "having")
attributedText.apply(font: UIFont(name: "HelveticaNeue-CondensedBlack", size: 20)!, subString: "multiple")
attributedText.apply(color: appRedColor, subString: "multiple")
self.secondLabel.attributedText = attributedText
Output will be the below:
Underline Attribute
We can achieve the underline beneath any substring using NSAttributedString.Key.underlineStyle key.
Add below functions in the AttributedString.swift file.
  // Underline string
  func underLine(subString: String) {
    if let range = self.string.range(of: subString) {
      self.underLine(onRange: NSRange(range, in: self.string))
    }
  }

  // Underline string on given range
  func underLine(onRange: NSRange) {
    self.addAttributes([NSAttributedString.Key.underlineStyle: NSUnderlineStyle.single.rawValue],
                       range: onRange)
  }
ViewController class and add below code in your viewDidLoad function.
let text = "This is underline string"
let attributedText = NSMutableAttributedString.getAttributedString(fromString: text)
attributedText.underLine(subString: "This is underline string")
self.thirdLabel.attributedText = attributedText
Below will be the output of underline text.

Strikethrough and Stroke Attribute
Strikethrough and stroke attributes are really awesome and pretty easy to use. Add below functions in the AttributedString.swift file.
  // Apply Strikethrough on substring
  //1
  func strikeThrough(thickness: Int, subString: String)  {
    if let range = self.string.range(of: subString) {
      self.strikeThrough(thickness: thickness, onRange: NSRange(range, in: self.string))
    }
  }

  // Apply Strikethrough on given range
  //2
  func strikeThrough(thickness: Int, onRange: NSRange)  {

    self.addAttributes([NSAttributedString.Key.strikethroughStyle : NSUnderlineStyle.thick.rawValue],
                       range: onRange)
  }

  // Apply stroke on substring
  //3
  func applyStroke(color: UIColor, thickness: Int, subString: String) {
    if let range = self.string.range(of: subString) {
      self.applyStroke(color: color, thickness: thickness, onRange: NSRange(range, in: self.string))
    }
  }

  // Apply stroke on give range
  //4
  func applyStroke(color: UIColor, thickness: Int, onRange: NSRange) {
    self.addAttributes([NSAttributedString.Key.strokeColor : color],
                       range: onRange)
    self.addAttributes([NSAttributedString.Key.strokeWidth : thickness],
                       range: onRange)
  }
In 1 and 2: pass thickness of strike to apply on given range or substring.
3 and 4: these two functions will be use to create stroke string, which required three parameters, color of stroke, thickness of stroke and substring or range. Now create one more UILabel in your ViewController and add below code in your viewDidLoad function
let text = "This is a strike and underline stroke string"
let attributedText = NSMutableAttributedString.getAttributedString(fromString: text)
attributedText.strikeThrough(thickness: 2, subString: "This is a")
attributedText.underLine(subString: "underline")
attributedText.applyStroke(color: appRedColor, thickness: 2, subString: "stroke string")
self.fourthLabel.attributedText = attributedText
Now the output will be like below

Shadow Attribute
These days shadow string is getting pretty popular. It’s give a string a 3D look and make it more beautiful. To add shadow over any string you need to set these properties, shadow color, widht, height and radius. Now add below two functions in your AttributedString.swift file.
  // Apply shadow color on substring
  //1
  func applyShadow(shadowColor: UIColor, shadowWidth: CGFloat,
                   shadowHeigt: CGFloat, shadowRadius: CGFloat,
                   subString: String) {
    if let range = self.string.range(of: subString) {
      self.applyShadow(shadowColor: shadowColor, shadowWidth: shadowWidth,
                       shadowHeigt: shadowHeigt, shadowRadius: shadowRadius,
                       onRange: NSRange(range, in: self.string))

    }
  }

  // Apply shadow color on given range
  //2
  func applyShadow(shadowColor: UIColor, shadowWidth: CGFloat,
                   shadowHeigt: CGFloat, shadowRadius: CGFloat,
                   onRange: NSRange) {
    let shadow = NSShadow()
    shadow.shadowOffset = CGSize(width: shadowWidth, height: shadowHeigt)
    shadow.shadowColor = shadowColor
    shadow.shadowBlurRadius = shadowRadius
    self.addAttributes([NSAttributedString.Key.shadow : shadow], range: onRange)
  }
Now create one more UILabel in your class and add below code in your viewDidLoad
let text = "This string is having a shadow"
let attributedText = NSMutableAttributedString.getAttributedString(fromString: text)
attributedText.applyShadow(shadowColor: .black, shadowWidth: 4.0, shadowHeigt: 4.0, shadowRadius: 4.0, subString: "This string is")
attributedText.applyShadow(shadowColor: .black, shadowWidth: 0, shadowHeigt: 0, shadowRadius: 5.0, subString: "having")
attributedText.applyShadow(shadowColor: .black, shadowWidth: 4.0, shadowHeigt: 4.0, shadowRadius: 4.0, subString: "a shadow")
self.fifthLabel.attributedText = attributedText
Now the output will be like below.
If we put all UILabel together screen will be look like below.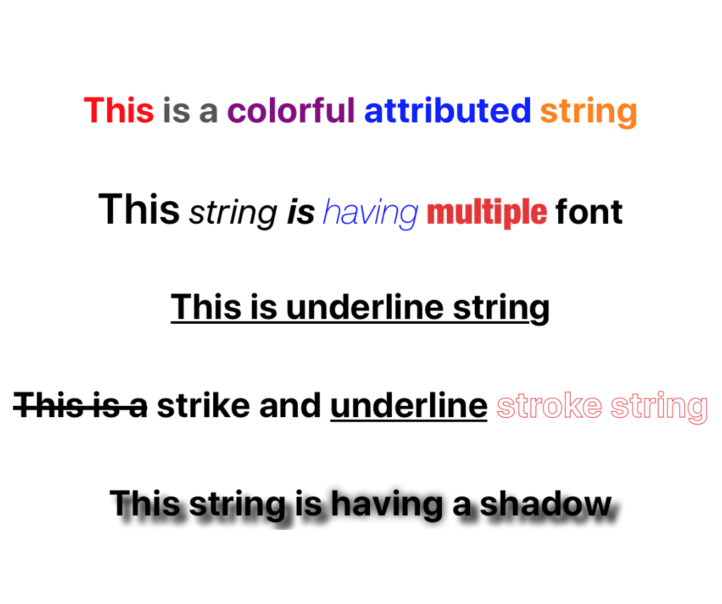
You can download the full source code from here.
Read our next article: Everything about CAGradientLayer in just 5 mins
Good tutorial, great job!
Way cool! Some extremely valid points! I appreciate you penning this post and also the rest of the website is
extremely good. It’s appropriate time to make a few plans for the longer term and
it’s time to be happy. I have read this put up and if I may just I desire to counsel you some attention-grabbing issues or suggestions.
Perhaps you can write subsequent articles regarding
this article. I want to read more things approximately
it! I have been browsing on-line more than 3 hours today, yet I by no means found
any attention-grabbing article like yours. It is pretty
worth sufficient for me. In my view, if all site owners and
bloggers made good content material as you did, the internet will probably be a lot more helpful than ever before.
Very interesting information!Perfect just what I was searching for!
Great tutorial. I hadn’t added rawValue to the underline & strikethrough attributes and the compiler didn’t complain, presumably because it is an Any, so I was saved by your article. Thanks.